This article discusses the various forms of moisture damage, the forms of moisture, and how water vapor can make it’s way throughout the home by different gradients. A “gradient” is the movement of something across an area of difference. Gradients are named according to the force that causes the movement. Gradients include thermal, concentration, and pressure. Something to keep in my when performing an inspection.
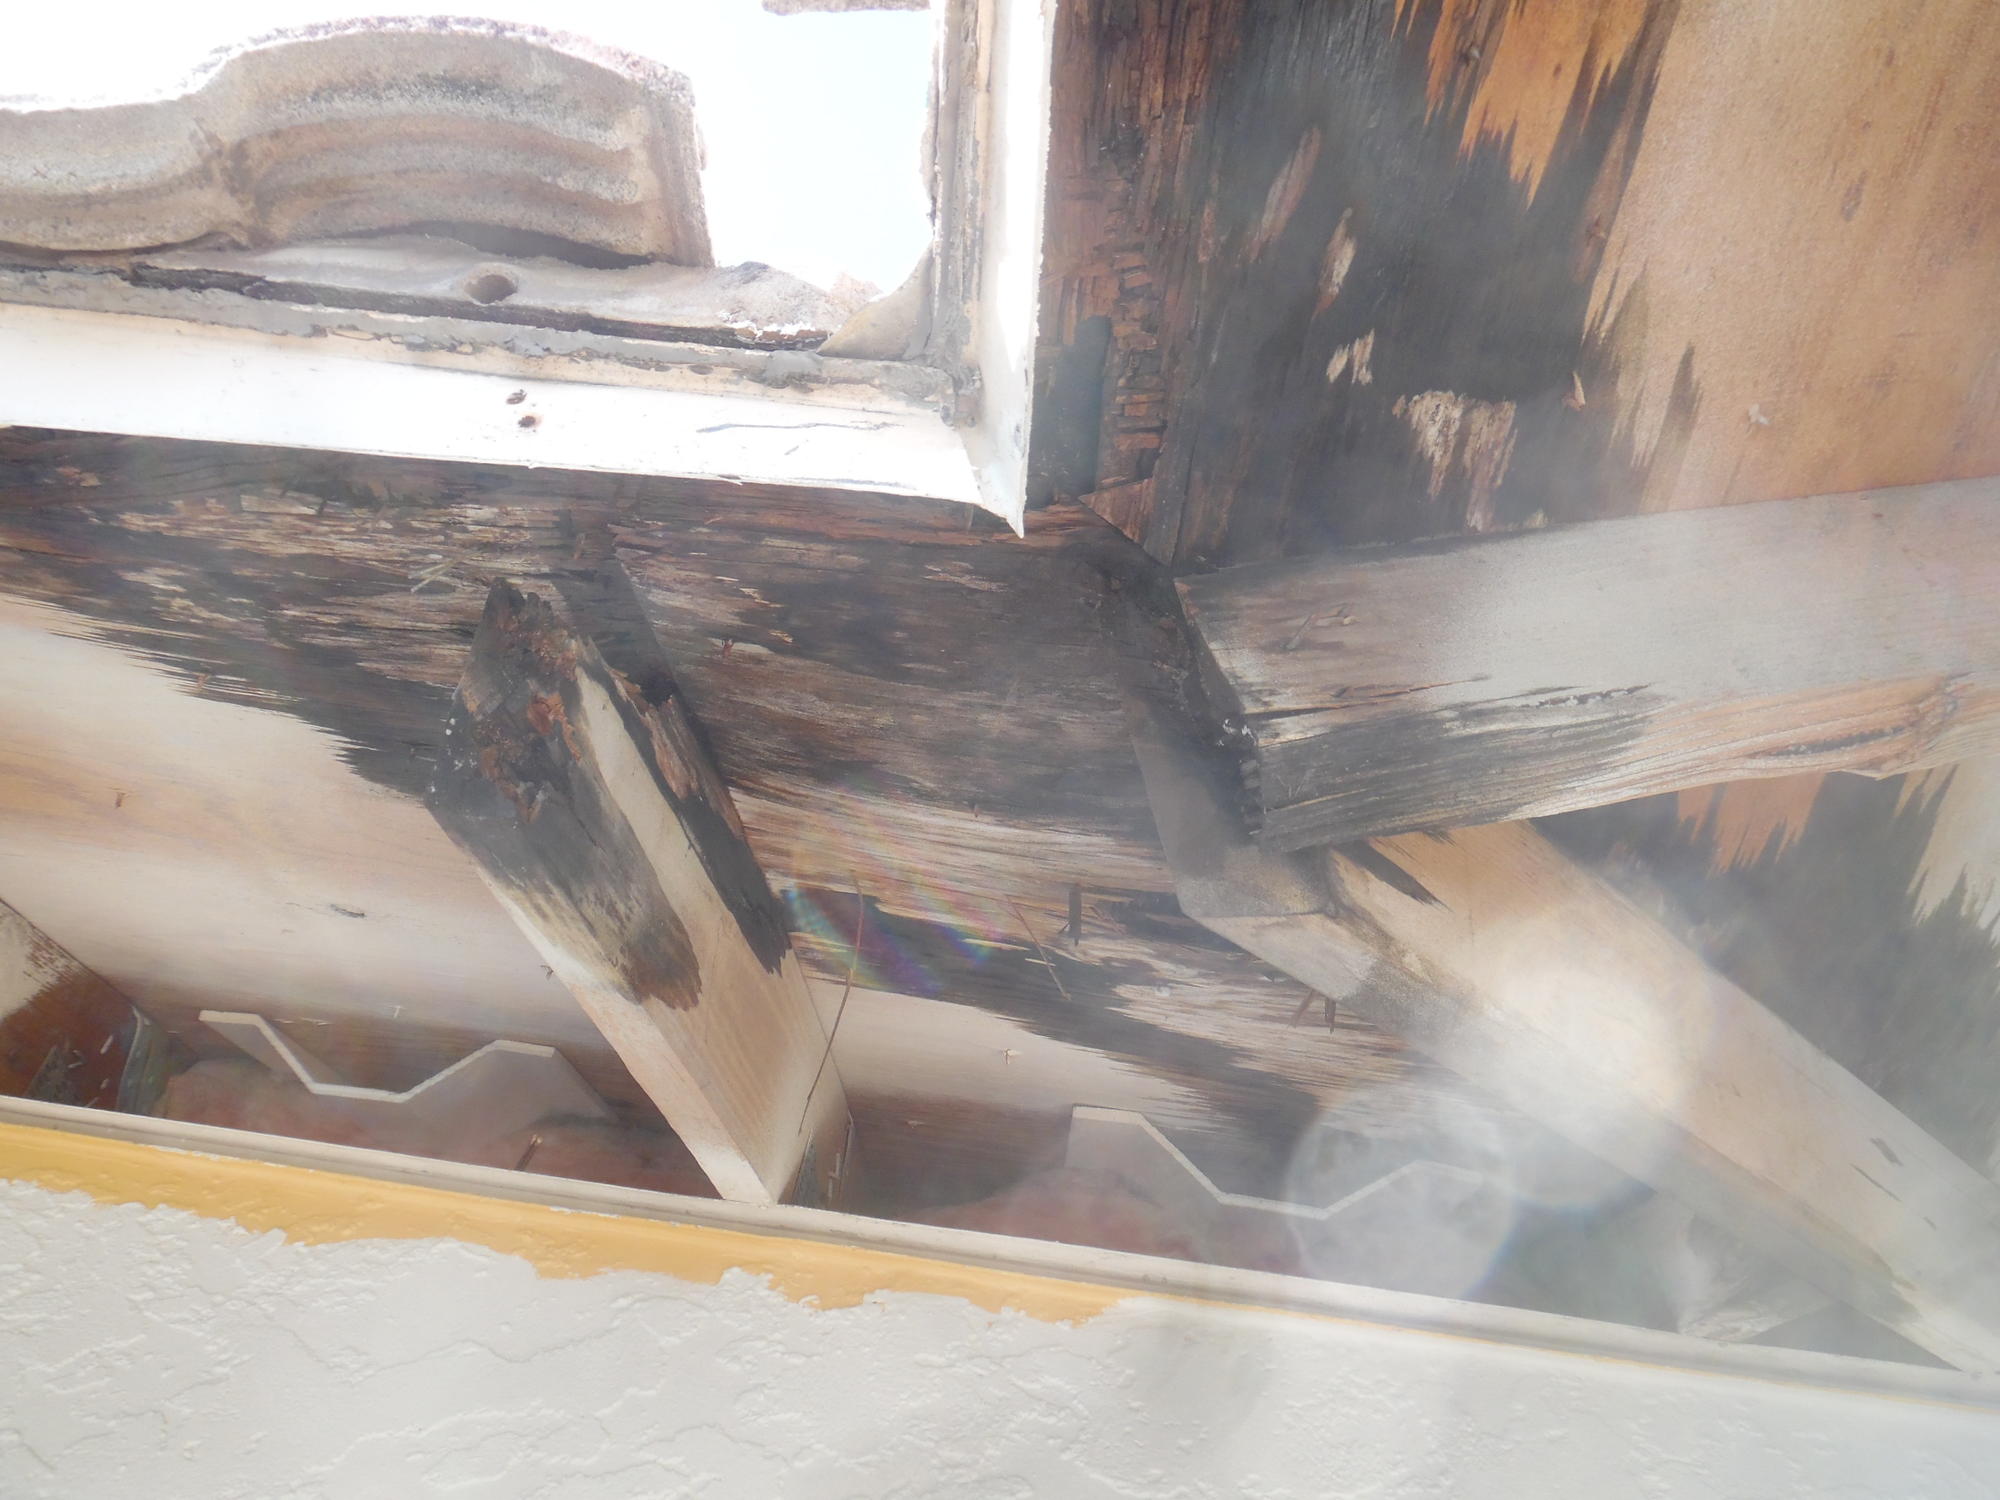
I observed this fascia on the east wall on the north end showing signs of insect damage and flaking paint. The open soffit showed that the underside of the roof sheathing had significant moisture damage. The top plate extension also showed signs of moisture damage. I recommend further evaluation by a qualified roofing contractor.
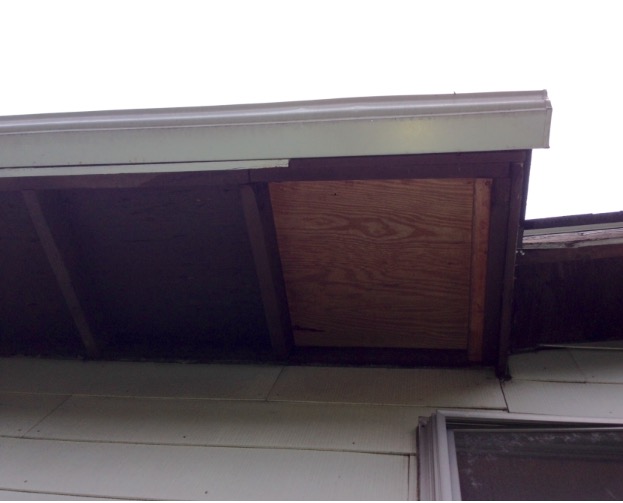
I observed this fascia on the east wall on the south end showing signs of flaking paint. The open soffit showed that the underside of the roof sheathing had been covered with a piece of unpainted plywood and nailed to the 2x6 rafter with an unpainted 2x4. The rest of the exposed underside of the sheathing showed moisture damage. I recommend further evaluation by a qualified roofing contractor.
Re: article “Mastering Roof Inspections: Moisture Problems”
by Kenton Shepard and Nick Gromicko
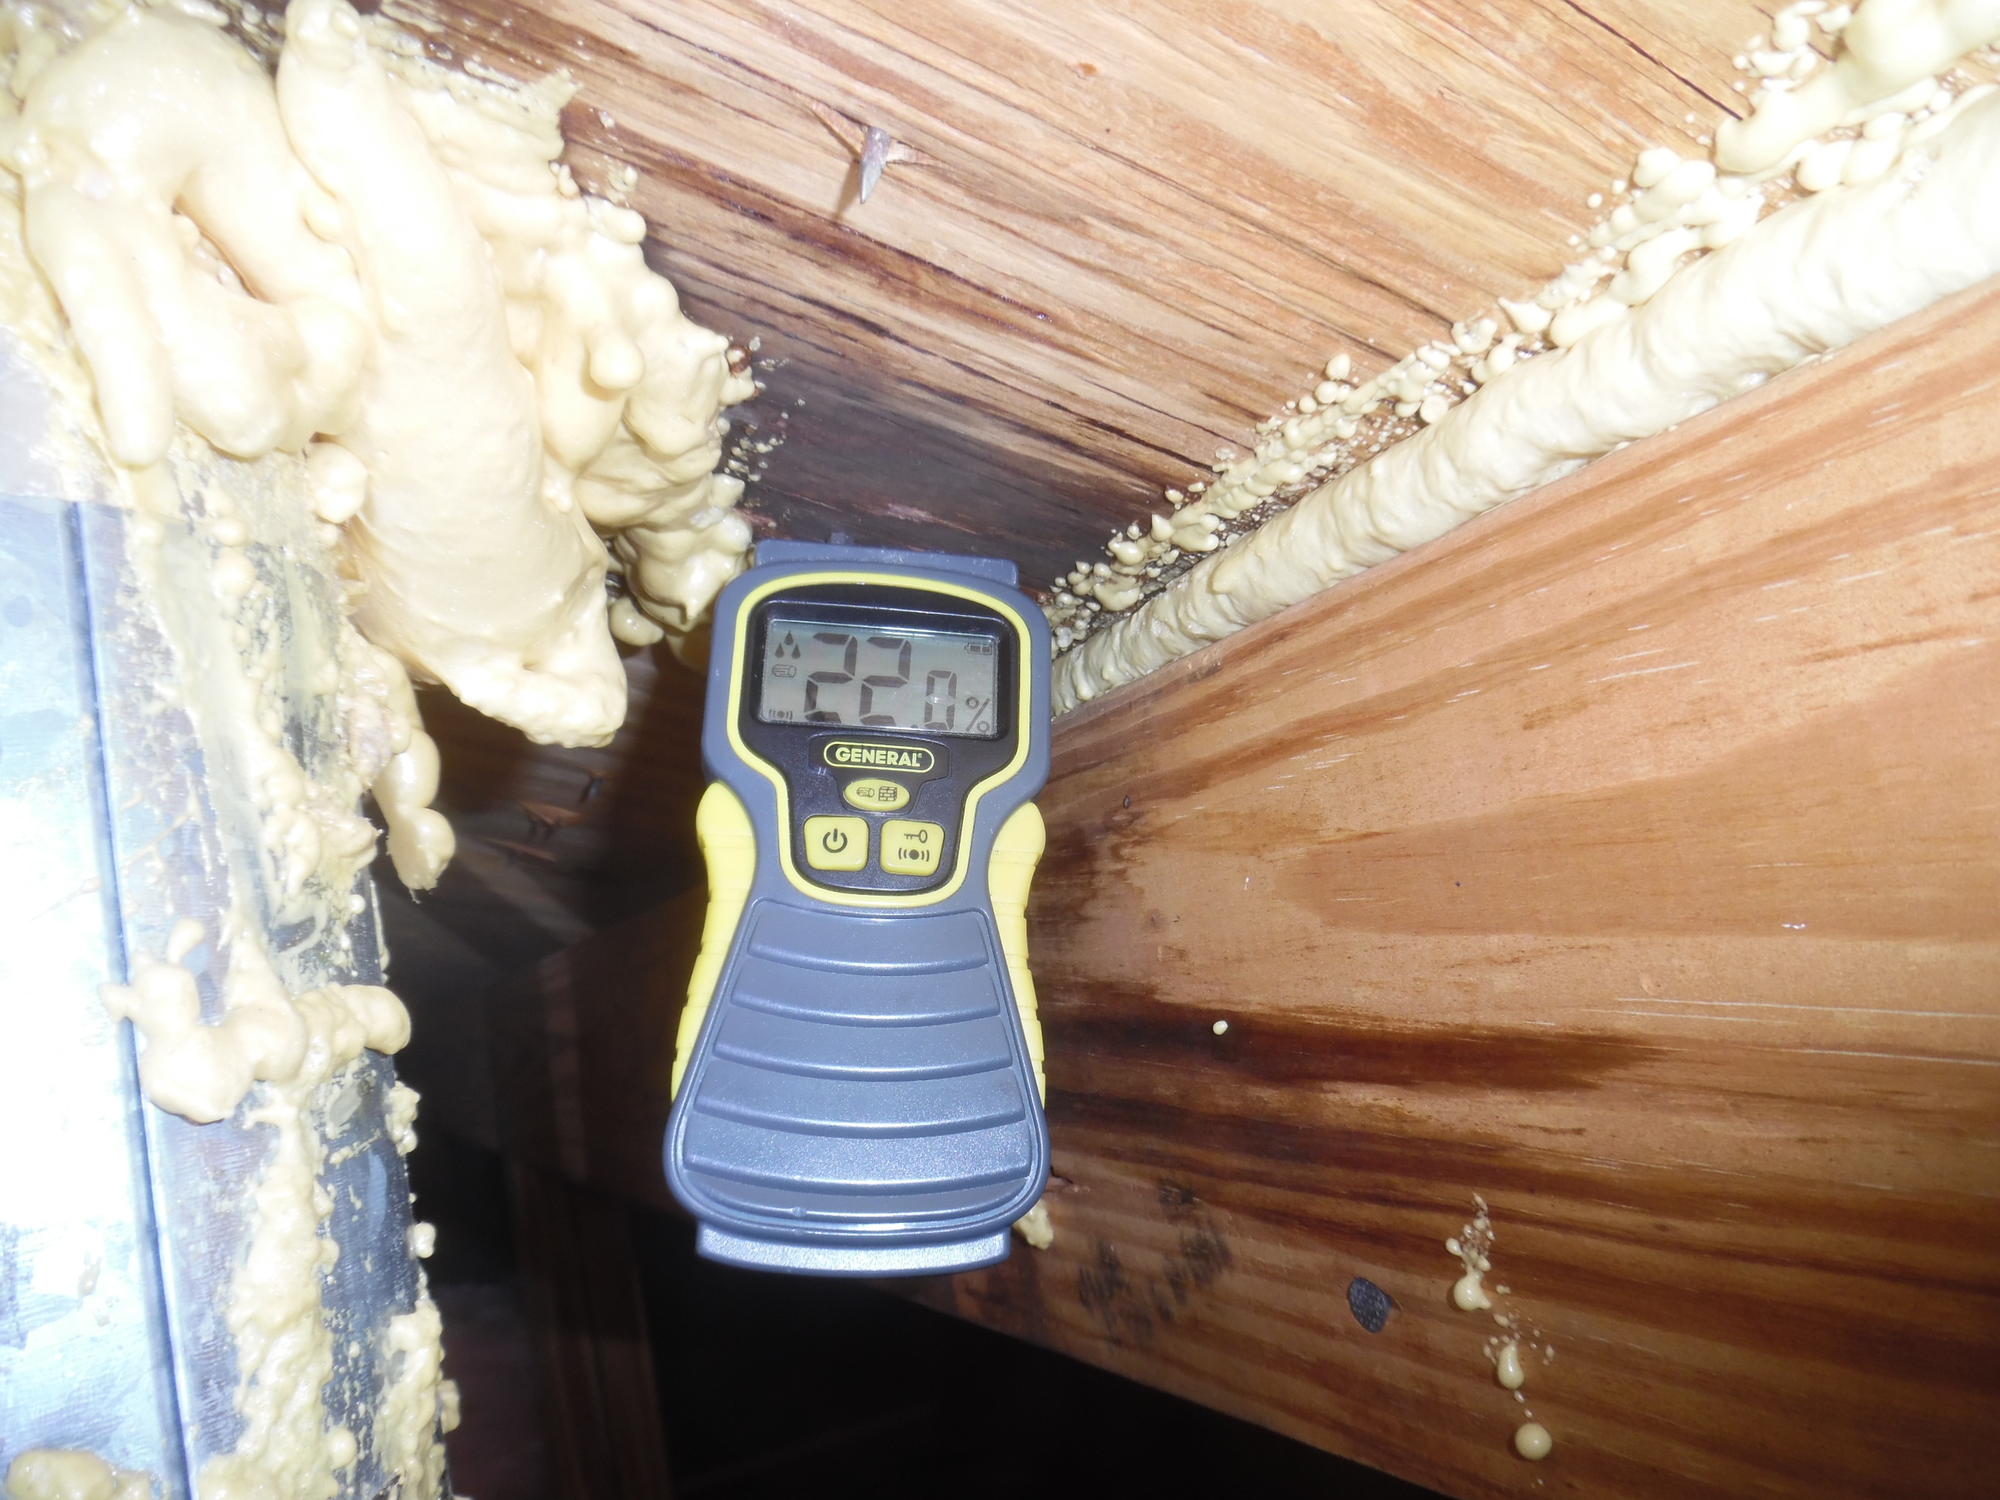
Moisture intrusion causes property damage through decay, which occurs when moisture levels reach 20% which can be reached with a small trickle. Often this is manifested as drywall ceiling stains or bubbling paint on trim. Structural damage, of course, is more serious and costly than a finish damage, which can be repaired relatively easy. Corrosion of metal fasteners can cause otherwise solid assemblies to fail over time.
Other damage is related to safety. Spores are released in the air when dormant mold reaches 1 20% moisture level. Mold can affect those with allergies, lung disease and immune issues.
A moisture meter is handy and gives clients confidence in the inspector’s professionalism. Starting inspectors can communicate the moisture damage issues sufficiently without them until a purchase can be made.
I would highly recommend this general house inspection video by Jim Krumm from Colorado’s Best Inspections. There is a very helpful part on roof inspection of a split level house with multiple levels and surfaces. It gives some insights to the best way to handle a complex roof.
I did an inspection on a church building that had just been completed. During a rainstorm water leaked through the dropped ceiling onto the floor below. Clear plastic tile in the dropped ceiling had a puddle of water in the middle of it. I went up on the roof to see why the water intrusion. There were several issues. 1. the roof slope was nearly level, 6" in a 30’ run, and the roofing material was rolled roofing that was torched on. 2. there were places where the subsrate sheathing was lower, causing pooling on the surface of the roof, and #3, the plastic cement that covered the seams, had cracks in it. It had not been covered with silver sealant that would protect the plastic cement from drying out and cracking. It will take some serious work to rectify these problems.
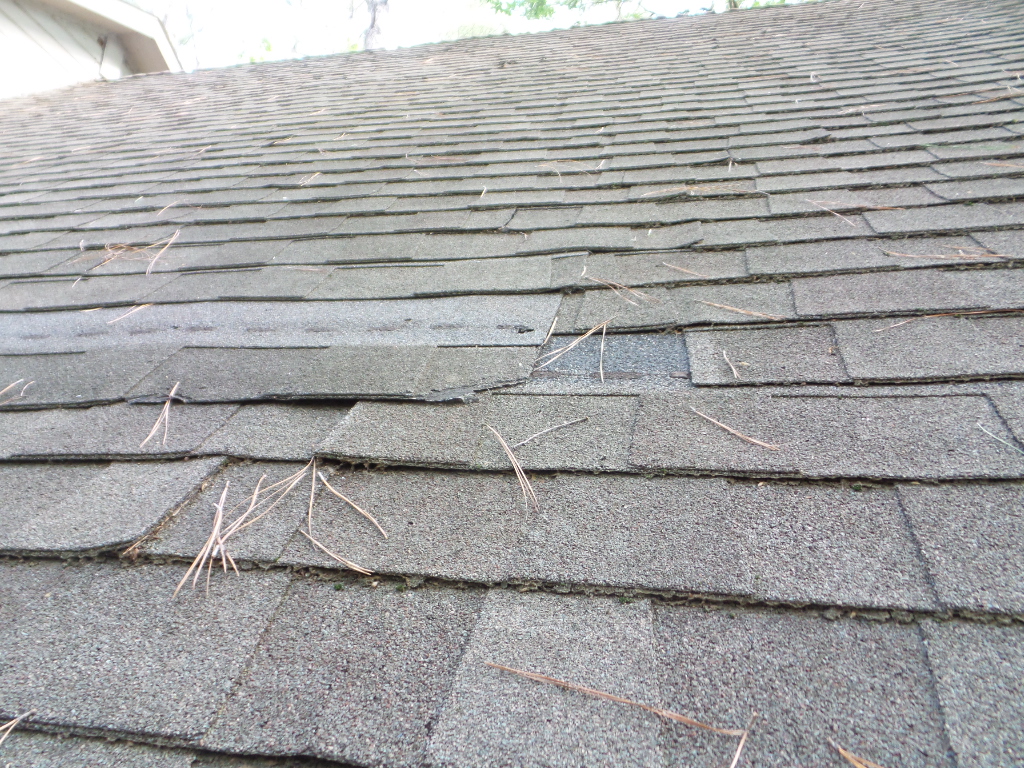
Hail damage on asphalt composition shingle. A few missing granules and the fact that you cannot see evidence of a hail strike does not mean there is a functional failure. Granule loss has to be visible to the casual observer to qualify as functional damage.
Counter flashing is designed to prevent moisture from entering behind the vertical flange of headwall or sidewall flashing. Properly installed, counter flashing sections are inserted into the mortar joints and the joint is sealed. This is time consuming which is why most of the counter flashing on brick and stone walls will be incorrectly installed.
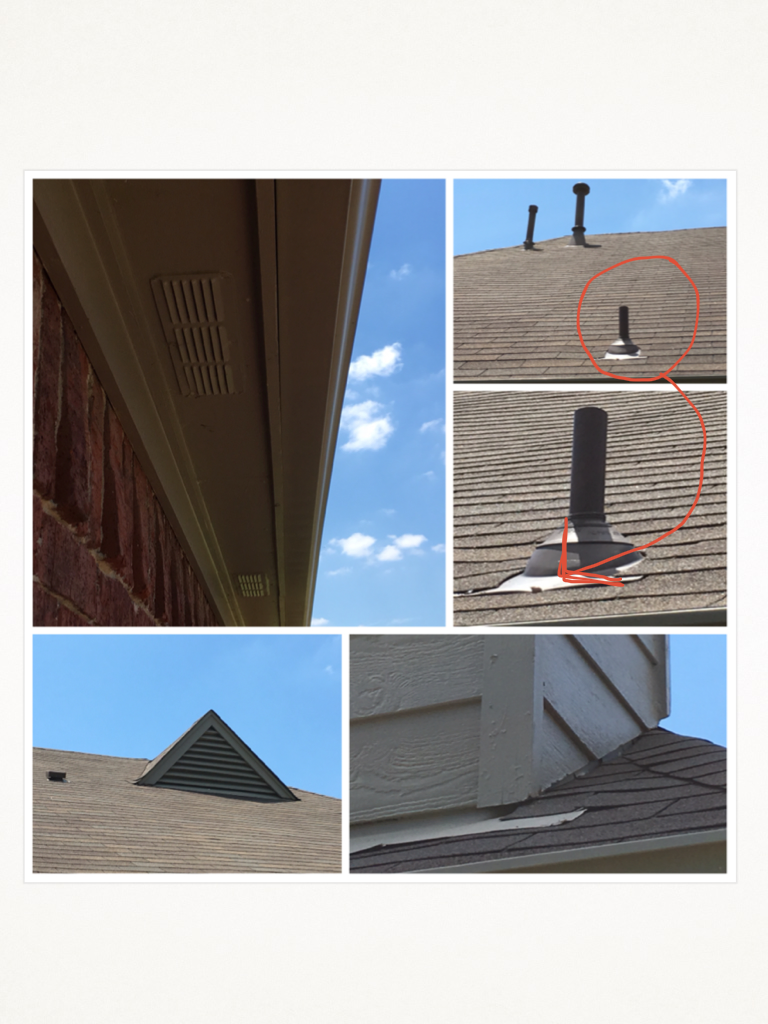
This is a picture of a roof penetration on a newly roofed house. I noticed that the existing vent pipe flashing had been reused and painted over and already show signs of rusting and deterioration. Also, the collar is about 16 inches above the top of the vent pipe flashing. I recommend a roofer to inspect and repair.
Articles 1-5: Mastering Roof Inspections- Accessing the Roof
InterNACHI’S Standards of Practice do not require an inspector to walk on a roof. However, with my experience as a general contractor for 36 years, I am very comfortable walking on a roof. Even though it is not required, I feel it will provide my clients with a better service and will give me a business edge against any of my competition who don’t walk roofs during inspections. Having said that, because of our weather in Montana, there will be certain circumstances where I will choose to not get on the roof.
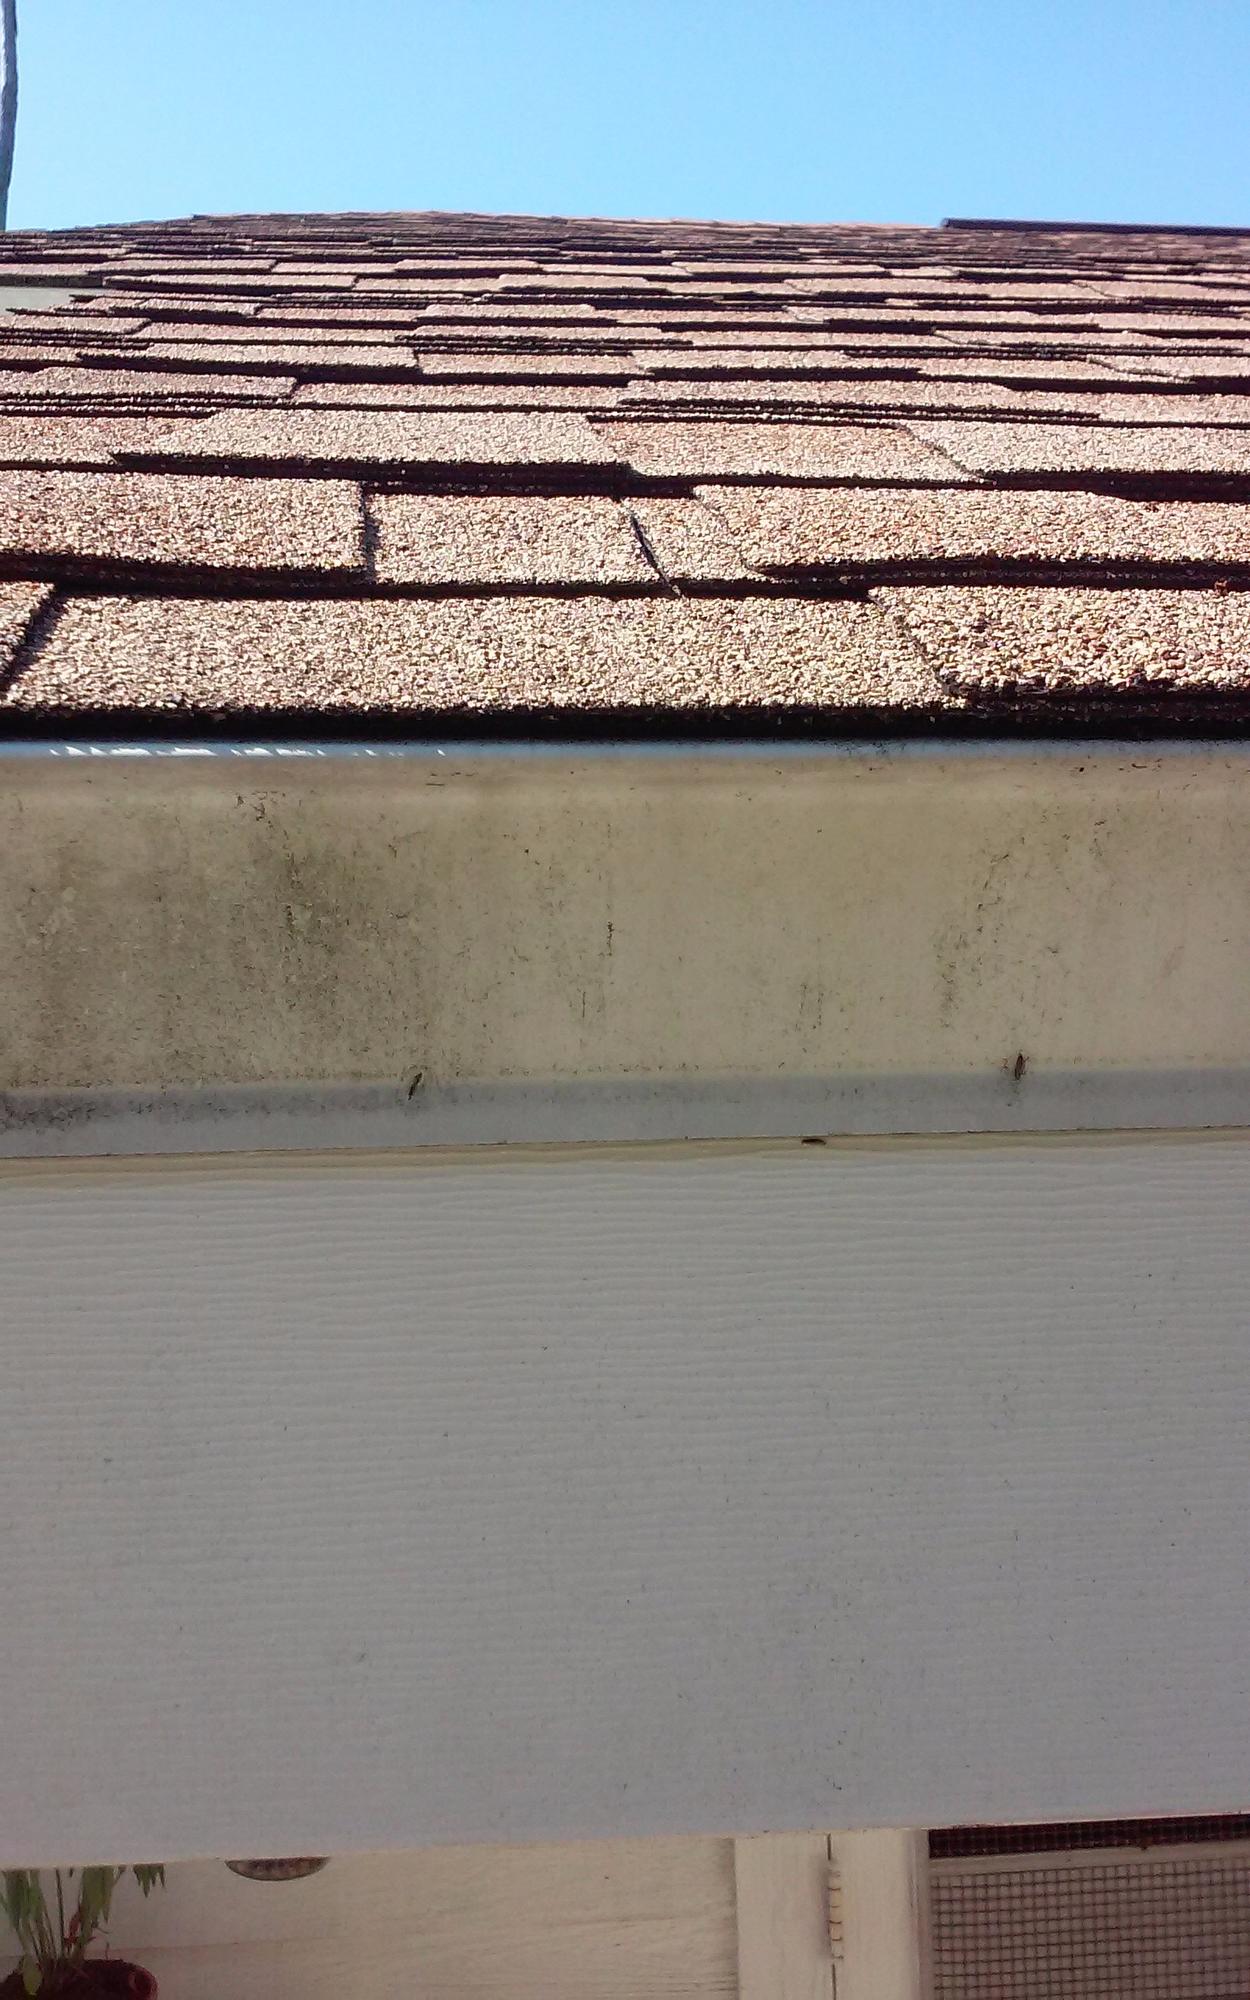
A visual inspection was performed on the roof of this property. Observed in this photograph is the drip edge and 3-tab asphalt shingles. The drip edge is installed correctly under the shingles and shows no signs of moisture build-up or damage. The asphalt shingles are in great condition as well with no missing sections and great gravel coverage.
This is a photo of water damaged that was not visible at the time of my inspection. The water damage was hidden behind a super gutter system that is commonly used in South Florida where the screen enclosure butts up the to exterior of the house. The damage was reveled after the gutter system was removed by the new owner to install a new screen enclosure. This was caused by the past owner not cleaning the gutter system which backed up and cause the sheathing to wick up water causing damage.
When inspecting a roof, the first thing you want to do is identify what materials make up the roof and home many layers of it there is. Next you should look for any pent rations such as chimneys or vent pipes, and the condition of the roof surrounding it. After you’ve inspected the roof finish in the attic to see the structure underneath.
The two articles I read were “Collar Ties vs Rafter Ties” and “Compost Pile Hazards” Dealing with the second article first, I was surprised that compost piles were a part of the home inspection. This article was of interest to me, because we have a compost pile off to the side of our garden. I noted that we had done a couple of things right, such as having the compost pit a long way from our house (about 100 ft.), having a “vegetarian” compost, and usually covering the garbage with a light layer of dirt. I was not aware, however, about the biological risks of molds and other diseases. I don’t wear a mask when dealing with the pile, because it is not dry. There doesn’t seem to be any danger of the compost catching fire, because it is relatively small and doesn’t build up a lot of heat. Earthworms are able to survive in it, so it must not be too hot. The first article deals with collar ties and rafter ties. I wasn’t clear about the difference in these two types of ties, because I haven’t used rafter ties, because the ceiling joists have stabilized the walls that I’ve built. The article explained that collar ties are not installed to prevent wall spread, but to strengthen rafters to support heavier loads. They are put in the upper one third of the rafter. The rafter ties are installed in the lower third of the rafter, sometimes just above the ceiling joists. They are especially helpful when the ceiling joists run parallel to the walls.
Attached is a roof image that shows the transition from a dimensional asphalt shingle gable to a low slope/flat roof using “modified” rolled asphalt roofing. Both these systems are just a few years old & in excellent condition. Though not easily visible in this photo, the rolled roofing goes up the slope for what appears to be at least 12" (under the asphalt shingle) and of there is the proper use of a drip edge flashing in the foreground of this photo. There appears to be an area of ponding that could pose a problem in the future.
I chose to inspect my own roof on the house that i just recently purchased. The roof is only 8 months old and has only one layer of shingle on it. This is a basic three tap shingle placed on a hip roof. I walked the perimeter of the roof line to check for drip edges. There were none to be found. There are, however, gutters that surround the entire roof line. They were attached properly into the fascia board with no loose brackets. The gutters were clear of any debris and the down spouts directed the water away from the foundation of the home.
I then looked for proper ventilation of the house. You’ll notice in the pictures that there are gable vents as well as soffit vents. This is adequate ventilation for the size of my attic space. I then walked into my attic as it is a walk in style. I could not see any signs of water discoloration on the decking, rafters, or insulation.
Next I began looking at the penetration points through the roof beginning in the attic space. Again I saw no signs of leaks from within the attic. I then moved back outside to look at the same points from the ground level. I noticed the flashing on the chimney looked sufficient but the PVC vent pipe caught my eye. You will notice in the pictures that one faster is raised up from the flashing. Although it has not yet caused any issues I will be fixing it as soon as possible as a preventative measure.
Reading & writing assignment for Roof inspection Course:
Article #1-
Underlayment Types:
Asphalt saturated Felt: this is still the most commonly used underlayment in SW Florida. There are a large number of older homes in SW FL where the slope are less than 4:12 so the double layer of underlayment is required. So knowing the “19 inch overlap” to create the double layer is important information for the South Florida inspector to have.
Also in SW Florida (or at least many counties), a secondary water barrier (SWB) is required when installing a new roof. While the felt is considered a SWB from most permitting agencies, it is not what the local building code requires. They use of a self adhesive modified Bitumen.
Also good information to know was that the materials used to create the asphalt saturated felt is becoming in short supply due to newer refining techniques…
2nd Article: Mastering Roof Inspections: PESTs
Again, living and operating in SW Florida where pests are “king” this article has special significance.
Most common here are “Palm Rats”. Raccoon & Opossums are also frequent unwelcome visitors to our area attics. Palm Rats are almost guaranteed to invade your attic if you do not trim the trees near your home. Here, Palm trees are most common trees near the house. As the palm grows, the palm fronds create an easy “bridge” to the roof. These fronds also cause significant damage to an asphalt shingle roof as they “sweep” the aggregate loose from the shingle.
Removing palm rats & other “critters” is a big “specialized” business in the SW part of the state.
In our inspection of a home we noticed microbial growth on the cathedral ceiling, right at the peak. We talked to the home owner and asked if they had put a new roof on lately? The homeowner informed us he did just a few years back. We discovered that the insulation was packed into the the 3 1/2 rafter area and they removed all ventilation in the cathedral ceiling. As went outside the home we discover the roof had a swayback issue as you can see form the picture. Again we talked to the home owner to see if anyone modified the trusses? He informed us they cut the ceiling joist out so they could have a cathedral ceiling. We informed him he needed to contact a engineer to look at the home as well as a contractor. This is a safety issue.
Roof is original and 17 years old. The roof’s finished surface is a three-tab asphalt shingle. Two penetrations shown have boots that were installed correctly. Boots show no signs of unusual wear. Shingles are in good condition with no signs of wear.
As this article points out, Time and unforeseen events affect us all. we need to be prepared for an emergency. As individuals who are respected and trusted in the community, it would be kind on our part to remind the homeowners to have a emergency plan in place, weather its a one day event or a 3 day emergency event. They can plan ahead for what they will need for personal care and securing their home. They may need a- to go bag with all their essentials such as medication, water, flashlight, copies of personal documents, copies of insurance documents, contact numbers of family members and any medical paper work. They will want to consider a plan to shut off any utilities and how to turn them back on when they return. In the end, they want to prepare ways that they can stay calm to help each other.