A little on the Commercial side of things.

Wrapping up the Project before the 28th.

Landscape improvements going in like this 2’ thick granite block retaining wall. The back side of the wall backfilled with stone and a fabric to prevent silt from coming out the vertical and horizontal joints.

Installing black granite counter tops in the food court. Came in about 8-10’ pieces and heavy as a rock, ha. ha.

Checking out the epoxy joint adhesive on the granit and figured I would also capture the gas hook-up to the grill.
The gas supply comes from underground and up to the ceiling of the second floor where the Main Gas shut off is as it comes in the building and also serves the roof top Make-up air unit for the exhaust hood.

It is kind of redundant, because the gas valve that you see behind the grill will activate when a head on the suppression system activates and also sends a signal to the fire alarm panel. The fire alarm panel will then activate the main gas shut-off where it comes in to the building.

The main gas shut off was Engineered with the type that closes when the fire alarm panel is energized.
When the fire alarm panel is reset, the gas valve was automatically open.

Well, I did not buy this set-up and brought it up to the Owners and Architect.

I said the way you have this designed, everytime you have a fire alarm drill or the real thing and re-set the alarm, the gas is now flowing in the building with the possibility of pilots out, defective thermal couples, defective electronic gas selenoids, and gas is pouring in.

They entertained my safety concern and paid an extra $1400 to change the main valve to a Mainually Reset Valve.

Notice in the picture the steel cable that will prevent the flexible gas line from being damaged when the grill is rolled out for cleaning purposes.

Fire suppression system electrical and fire alarm interface control box.

Fire suppression system at the Pizza Oven.
Hope they don’t burn my pizza with an open flame. ha. ha.

Marcel :slight_smile:

Well, back to the Gym Project.

Things are going along fairly well considering it is 18,000 sq. ft…

The existing slab all removed and 6" of stone and underdrain grid has been installed.

The vapor barrier has been installed along with a re-bar matt at 16" o.c. spacing.

The reinforcement is because it will not be saw cut for control joints in prevention of slab curling, which would not work with the tolerance of the Gym Floor installation.

The Gym floor requirements on moisture is set at no more than 4.5 lbs. per 1000 s. f. of slab area in 24 hours.

Some flooring material requires 3 but no more than 5 for any finished flooring material.

[ATTACH]

You will notice that the vapor barrier is down and Manufactured by Grace Manufacturing.
This product has a Perm rating of 0.00.
The critical fact of vapor permeability importance is due to the floor system being installed and it’s requirement as of other floors to remain in a usefull state as it was designed for.

As you can see here in an inspection area, the underdrainage is visible in 6" of stone with a textile fabric on top of the clayier till.
This is a depression also for gym tennis court inserts.

Above and beyond this and extra measure, a complete perimeter installation of floor drains are being installed under the wood floor to guard from a water source other than the ground. These are connected to an outside outfall.

Since the use of this gym is critical, eliminating slab moisture is of the up most importance and procedures on this is explained in another post that I will insert in the BB., under this same category.

Vapor barriers: nuisance or necessity.

Hope some learn the importance of this information.

Marcel :slight_smile: :slight_smile:

</IMG></IMG>

Yes and I have all seen the cement finishers when they think no one is looking to take their shovels and punch the Plastic so the floor will set up quicker so the do not have to work 1/2 the night finnishing the floor.

Hope they do not do this any more .
… Cookie

Roy; they would not even think of it when I am around, and the only water they are going to see is the bleed water.
We will be using a mid-range concrete with high cement low water ratio, so that should not be a problem.

And yes I have seen that stunt you are talking about.

Last time it happened, it cost them some bucks to come and clean the floor drain traps. ha. ha.

Marcel :slight_smile: :smiley:

I am in the hopes that I will have time to be present on Thursday’s projected concrete pour scheduled for the 18,000 s. f. pour with the use of a laser screed so I can share the experience with all Members.

Will do what I can to keep you all in mind and post as many pics as I can for those that have not seen this type of installation.

Marcel :slight_smile: :slight_smile:

Well, the gym floor pour is on schedule and ongoing, and expect to be done by 1:30 p.m…

The mix design ended up being a 4000 psi mix with 1&1/2" and 3/4" stone.
Midrange additive was also added with no air entrainment.

Super flat floor achieved using a laser screed machine with a tolerance of 1/8" in ten feet for the gym floor.

300 cubic yards is anticipated.
The re-bar mat is being lifted on to plastic chairs as the machine moves back.

Here are some pictures.

Marcel:)

Well, with good planning and scheduled activities the pour was completed at about 1:30 pm and the troweling finish at 6:30 pm.

A crew stayed behind till 7:30 pm to cover the slab with a moisture retention fabric which will stay on for 7 days.

Concrete slabs on grade can be found in nearly every single industrial, commercial, and residential building. Whether they exist below a layer of flooring material or are exposed, slabs on grade provide foundation for all building foundations.
Concrete slabs on grade can be as simple as your residential driveway placed and finished by hand or as complex as this super-flat commericial floor installed with laser-guided screeds and power trowels. Regardless of the intended use, the engineering principles remain the same. Essentially, quality materials combined with good design and expert workmanship yield the best concrete slab.

Some designers have adopted the practice of using the vapor retarder at the bottom contact surface of the slab, a low water cement ratio with water reducers to control the workability of the concrete mixture, and a mat of steel in the upper half of the slab to restrain shrinkage and with that to control curling.

Imediately after the pour, elevation profile was taken on a ten foot grid and plotted to submitt to the Gym floor Installer.
The 1/8" maximum within any ten foot was achieved.

Now the wait is on until the 7 day cure and the wait again when the moisture is down to the now recommended 3.5 lbs in 1000 s.q. ft. in 24 hours.

It will take at least 45-90 days to get in internal moisture levels to the Manufactures specifications.

In 30 days or so, a moisture test will be done using the Calcium Moisture test Method. It will be re-tested accordingly until the moisture levels are within the safe and approved scale.

Why cure concrete. Curing serves two main purposes.

  • It retains moisture in the slab so that the concrete continues to gain strength
  • It delays drying shrinkage until the concrete is strong enough to resist shrinkage cracking.
    The curing membrane used was as manufactured by Reef Industries.

http://www.reefindustries.com/upload…ecs/tg4000.pdf

[ATTACH]14013[/ATTACH]

Marcel:) :slight_smile:

Well, back at the Book Store project, the forms have been removed cleaned and trucked off site.

The waterproofing and underdrain has been started.

The system being used here is the Bituthene 4000 using a B2 primer for green concrete, Hydroduct 220 Drainage board with a 2" styrofoam as a protection board.

Once the membrane is applied, a bituthene lap sealant is used at all termination points and horizontal laps to assure of a good watertight seam.

Drain tile is used around the perimeter of the foundation, wrap in fabric and surounded in stone and the fabric wrapped over the top.

The whole backfill is done using nothing but 3/4" stone. Most likely the underdrain will see little water, the stone will let the water downhill until the pipes pick it up.

Busy today, but will try to submit more photos as we go.

Marcel:) :slight_smile:

BookStore waterproofing is completed and here comes the backfill phase.

Stone and more stone.

Boy, I bet you John Bubber would like all this stone. ha. ha.
6" perimeter drain used is a smooth interior Polyethylene drain pipe capable of sustaining traffic with a minimum of 12" backfill.

Marcel:)

Big project.

Students first day and finished not an hour to soon.

Marcel:)

Well, back to the Bookstore project.
It is time to get ready for structural steel arrival. and base plate elevations have to be prepared.

I use tapcon screws to set one with a laser and the other three are set with a hand level the screws can be screwed down or up to set the bottom of the leveling plates that are 1/4" thick.
The grout is placed and tapped down with a hammer until they rest on the screws. Tried to make this idiot proof. Works well.

Grouted plates.

Installing the grout.

Electrical conduits being brought in the building

Cored holes in the footing to bring in the Mechanicals.
The one pipe in is called a perma-pipe or Ric-wil would be another name.
Pre-insulated for direct burial for steam supply and returns.

Next phase will be steel delivery and erection for next week.

Marcel

Well, the steel has arrived for the Bookstore project. All four loads of it and know the sorting and organizing begins.

Erection will commence tomorror.

Marcel:)

Thursday morning, time to erect.

Starting to take shape.

Christmass tree, is picking up three beams at a time to same installation time.

Main floor and columns were all erected in one day with one steel worker.
Three support people on the ground.
Not including myself.
I was looking out the door of my office to make sure everything was being orchestrated right. ha. ha.

Marcel :slight_smile: :slight_smile:

Bookstore project update;

IM000006.jpg Steel beams a flying on the roof level

IM000007.jpg

IM000008.jpg

IM000015.jpg 
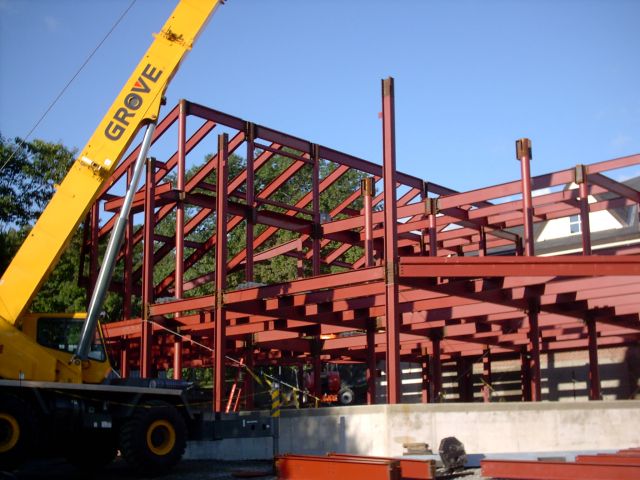
Last piece of structural steel done at 3:00 p.m.
One man erector with a crane operator and four man support crew. ahsome one man job.

Marcel :slight_smile: :slight_smile:
</IMG></IMG>

IM000001.jpg

Book store update on the steel erection.

Steel beams a flying.

Last piece at 3:00pm

Done

Pack up the Crane.

Bundles of deck for the Main floor and roof deck have been landed and now the torquing of the bolts, welding moment connections and installing perimeter bent steel plates for blocking and curtain wall system will commence.
There are also shear studs on this job and will show you the machine and how it gets executed in other follow ups if interested.
Until next time thanks for watching.

Marcel :slight_smile: :slight_smile:

</IMG></IMG>

Back to the Gym floor project;

It will be 30 days soon since the concrete slab was poured and has been monitored since for emmissions of water vapor until the moisture content is within the range of 3# per 1000 sq. ft…

Monitoring devices were installed called hygrometers set 2" in the concrete slab and monitors the relative humidity and temperature of the slab.

However, even after it has hardened, most concrete remains porous, so its moisture increases or decreases with changing temperature and humidity. Concrete’s permeability, the rate at which it will allow moisture to pass, depends on the size and distribution of the pores in the concrete matrix. Generally speaking, the lower the water-to-cementitious-materials ratio of a concrete mixture, the lower its permeability will be after it has cured. Concrete’s permeability can also be reduced by adding any of a number of products to fill in the voids in the concrete matrix.
Moisture given off by a concrete slab in an enclosed space is a concern. Two tests measure this vapor emission directly. One was developed by the ASTM Committee for Protective Coatings and Lining Work for Power Generation Facilities’ Subcommittee on Application and Surface Preparation. To use this method, ASTM D 4263, “Standard Test Method for Indicating Moisture in Concrete by the Plastic Sheet Method,” a plastic sheet is tightly taped to the concrete. After 72 hours, a humidity reading is taken under the plastic with a dew point hygrometer.

http://imgs.ebuild.com/cms/CONCRETE%20CONSTRUCTION%20MAGAZINE/2006/February/CC060201045L3.jpg

Photo: Engius
For in situ humidity testing, this sensor is inserted into a hole drilled into the slab, where it reads the relative humidity at the midpoint of the slab. Note the o-ring seals.

Determining what humidity level is acceptable depends upon the surface treatment to be applied. For flooring or related materials, as an example, the relative humidity must usually be below 80%, and the floor under the plastic should be free of dampness, discoloration, or damp odors.

The Process is long and tedious, for the monitoring devices of the relative humidity right now is down to about 84% 2" down and needs to be at 75% before it will be equivilent to 3# of moisture in a 1000 sq. ft. area which is the specification for the hardwood flooring Manufacturer and installer reccommendations.

The College Client chose to rent a dehumidification unit to help expedite the moisture remediation process at a cost of $9,000 per month.

Once the relative humidity test is at the 75% range another test.

A second direct test, ASTM F 1869, “Standard Test Method for Measuring Moisture Vapor Emission Rate of Concrete Subfloor Using Anhydrous Calcium Chloride,” was standardized in the 1990s by the Subcommittee on Practices of the Committee on Resilient Floor Coverings. Its development, however, goes back to the 1950s and the Rubber Manufacturers Association. Then it was known as the RMA Moisture Test, or the Quantitative Anhydrous Calcium Chloride Test.

Setting up the calcium chloride test devices is quick and easy, but care must be taken to ensure a good seal at the surface of the concrete.

I have a few pictures of the set-up.

Hope some are interested in this.

Marcel :slight_smile: :slight_smile:

Back to the book store project;

We have been busy, the steel is all up and decking is being installed.
Most importantantly is bringing in all the utilities required for the building to function as a whole.

Installing a drainage line through existing utilities. Communications, high voltage.

Communications, electrical, cable, telephone and Data from the Mother Building to the addittion.

Steam, sprinkler, domestic supply all installed in perma pipe.

All of this for a Book Store, makes you wonder doesn’t it? :slight_smile:

Marcel :slight_smile:

Hi Marcel, remember when I told you of the project in No. Berwick, we are converting a ranch into a cape? Had all kinds of problems with zoning, bank ETC. Well we are starting the project next week and I would like to post pictures of it but not sure where it would be appropriate. Any thoughts?

I think this could be a good educational thread, what do you think.

Pete

PS your posts on your project have been great!

Peter;

I believe that this post category is as good as any and everyone can share the educational values if any, to all the Members of this Association along with the public that have access to this site. I might be wrong, and should hold it to Members Only, but feel that sharing with many is worth more than sharing with few.

The needs of the many outweigh the needs of the few, remember ha. ha. Did I say that right?

I strongly believe, that our sharing of capabilities and experience can and may help a lot of new Inspectors trying to make a living out there and can use as much educational help and assistance as possible.

I make more money building than Inspecting, but Inspecting will come as more of a full time job when I retire and in the meantime, a few inspections a month or three months works for me. It keeps me in the loop and no overhead and fancy gadgets.

I will be the first one to look at your pictures Peter, and I hope you try the same thing for the benefit of all the Association Members.

Maybe you could call it; A little on the Residential Side of Things. ha. ha.

Marcel :slight_smile: :slight_smile: :wink:

</IMG></IMG></IMG>