Lets look at it for what it is. I see plenty of chimneys where the installation is simmilar. To step flash is easy but to counter flash takes time and effort (as well as a good grinder and mason blade) Many just use a couple of long pieces and counterflash, drive pin and then caulk. My house also has this and the last roofer used term bar and drive pins to secure. Then sealed the top edge.
The question is will it leak?? If it was done “correctly” it should not. How many do you see that are done “correctly”.
In reality if it is sealed on the top and bottom edges, as long as it is maintained it shouldn’t leak. This basically means you as the inspector must convey this in writing as well as explaining it to the home owner so they understand “if they do not maintain their roof it could and will leak”. I would also tell them it was not done correctly but every one I find leaking always was from lack of maintinance.
Exposed nails in pipe collars and ridge cap ends can also leak when they back out or rust so there is another area of maintenace.
There are always things in homes that are not done correctly per say, but use your past experience as an inspector to realize why the installation has failed in the past. This will give you a better understanding as to what can be done to prevent issues on the home you inspect. You can then tell the potential buyer that "the installation was not done correctly, but you can maintain it until the roof gets replaced THEN do it correctly. Unless it is leaking and then you just write it up.
All the chimney leaks I found were from lack of maintanance, poor installation or a combination of both.
I see this sort of thing as “standard” installation all the time. I state that this type of chimney flashing mat not have been done using generally accepted roofing standards and practices, but that a possibility exists that additional flashing was installed beneath,augmenting the sections seen. I explain that absent of invasive or desrructive inspection techniques being used, it is impossible to determine what is and is not present or installed correctly. I typically warn of the possibility of existing or future leaks and hidden damage. Finally, I recommend further evaluation by a qualified roofing contractor if further evaluation is desired.
If they ignore my comments, fine. If they choose a bum off the street to perform the inspection, it’s also fine.
I had a client complain about all the disclaimers that inspectors put into their reports, including ones like this one. Mind you, this was a raised ranch where virtually all of the sheetrock on the ground floor was recently replaced and where some of the edges of the laminate flooring were starting to raise. Sheetrock was also replaced throughout the entire garage. My comments were that all the sheetrock had been changed for no apparent reason, and thet it appeared as if the electrical wiring had also been changed (a sub panel was installed in the center of the house on the 1st floor). Flooring had been placed ON-TOP of hardwood flooring on the main floor in the living room, dining room, and hallway but not in the bedrooms. It was all a bit strange. Why it was done was unknown. Fire or water were the first things that came to mind, though I suggested neither in the report. I simply pointed it out and stated that I did not know. So, if a problem arose, some smart-*** monday-morning-quarterback couldn’t say “I cant believe he didnt comment on this”.
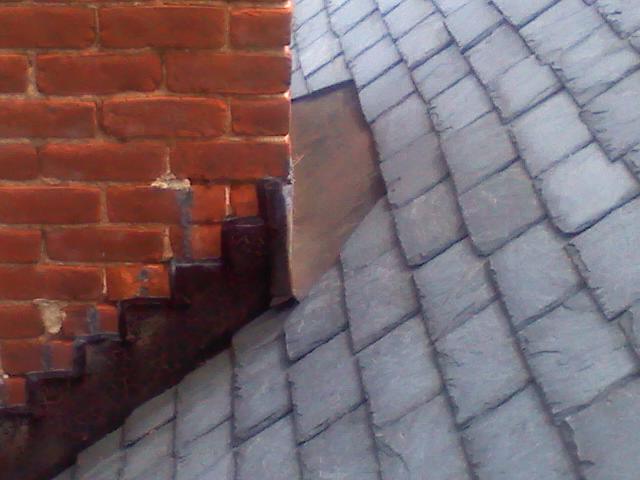
OK there are nails in the counter flashing.
I see no evidence of step flashing so that call needs more investigation. Suspect: Weather infiltration into the attic.
Possible brick-face spalling behind the flashing due to.weather infiltration. Deficiency: A.) The gummed Edge seal in the flashing is Stretched leaving voids.
Missing , Stretched, improper amount of.
B.) Nails in the Chimney flashing 45% bend.
Installation or maintenance of chimney flashing is often preformed by inexperienced and under qualified do it yourself handy men.
There should be no exposed nail penetrations or nail heads openly exposed to the weather in a roofing or tin flashing’s or copping system.
C.) Spalling brick faces.
D.) Nial’s in the over lapped flashing.
E.) Clay Corduroy brick was bylawed in mid 1980 in Quebec,
That chimney was re-pointed. Questionable job. Half OK BUT.
All seams and plains should be wrist locked.
I never use nails. Recommend: Recommend a technical exhaustive be preformed in the chimney flashing.
Investigate for step flashing and any other potential defects and deficiencies.
Step flashing allows for the independent movement of the chimney and roofing field.
Proper Chimney flashing procedure is an intaglio part of the weather tight process in the roofing system.
A licensed roofer with tin installation knowledge or a tin smith repair the chimney flashing.
This one I did looks better. My labour cover every with silacon . I screemed at him.
New apprentice mason. WOW.Said that is what he use to do with his mantor. HA HA.
Ouch. I was made.
.
Gummed edge flashing is the new normal.
If you bury the tin or metal 1- 1.5 inches into the masonry bedding or brick face then better:):).
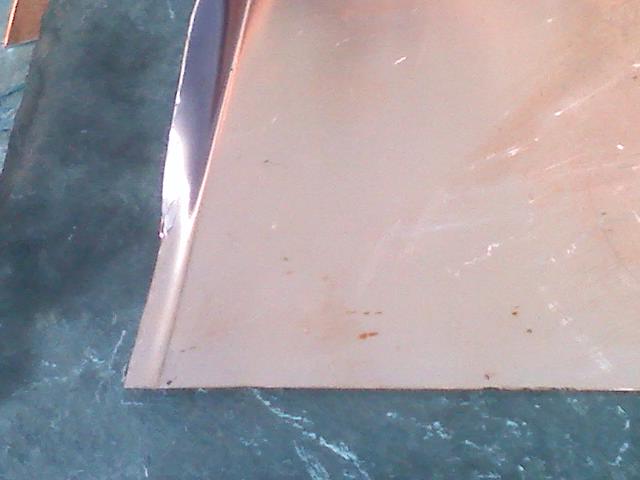
Wrist locking is folded ends of the metal that interlock within each others plane.
IE:wrist locked metal as in the photo of the flashing I installed in the BUR roofing system. It is friction fit. Compression when you fold the wrists to lock the metal planes will pull the planes together at the corners.
No nails in that system.
1.) If fasteners are required they should be inserted into holes drilled into the brick face.
Never nail into the masonry bedding.
1.) It disturbs masonry.
2.)Exerts unnecessary forces in all directs.
3.) can unlock old bricks bond above and bellow.
I will find an example or next job I will take a movie.
You can cut a cerf-cut 1.5 " inches deep into the brick face with a thin diamond blade also and insert the tin.
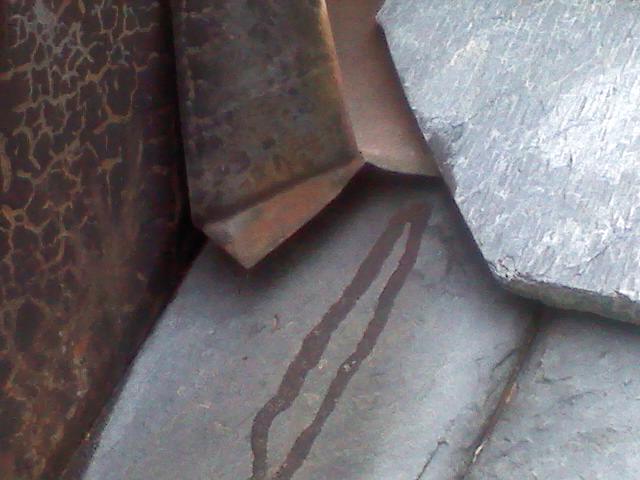
1.) The flashing has exposed nails.
a.) Call out the nails in the 45 degree angle.
b.) Call out the exposed nail in the 90 degree overlap corner plains. 4 corners and lots of exposed nails.
***No cricket : ***but I do not know the width of the brick in the chimney.
**30" ,inches **and wider needs a cricket.
That chimney is wrong at so many levels as you put it.:mrgreen:
Illustration below from Carson Dunlop illustration.
As to your other question about the Referral.
Give him a good talk to.
He is a back stabbed.
Ex plane to the client you grievances.
Just thought I’d share these with you. One is a chimney over 100 years old with Tinner’s wings and no caulk and no evidence of it ever being caulked. No signs of leakage either. The chimney is 5’ wide.
I’ve modifed the way I do Tinner’s wings when not using a cricket so there is a low point well out from the chimney that’s lower than the actual chimney corner. Wicking water goes to that outer point. I do caulk mine before sliding the pan in and folding the wings around. The foled wings prevent wind blown water form accessing the corner itself.
Note that the pans are under the slate/shingles so it doesn’t buck the water flow.
The last pic is just to let you know I also use crickets.
I don’t bother with too many ‘finished’ pictures, but I have some of this one. On the shoulder I made a foldable flap. The Zanchors went in, then the flap was folded over to cover the zanchors. I had asked if they would spring for a higher shoulder to be built up. It’s only 3" high at the corner.
I got a call that it had leaked this year. I went over and sure enough, the whole thing was packed solid with trash. Gutters, never cleaned, etc. I stepped in two diverters to catch the trash and direct the water past the corner, and put a screen over it too.
I was first taught to cut nice tight pretty corners. Later, when doing tear-offs, I’d see signs of leakage where the caulk had failed on every roof I tore off. Then, I worked with an old-timer that explained those tinner’s wings, ( when I tore off roofs with those, there was seldom, if ever any signs of leakage.) and I switched tot he old ways. I often get on roofs with those and the roof has settled so much, you can see through from side to side and they still don’t leak! There was a 3" gap under that pan in the first picture, BTW.
As an added step, I don’t cut the last step flashing to the crease. I cut it to the thickness of whatever material I’m working with instead. If water ever made it past the wind guard, it would find a channel instead of a hole.
I can relate to the tear-offs Franks.
I was told the faster I ripped off and prepared the roof the more time I had to learn.
I was shingling in 2 weeks.
Slate work was with a large company. Everyone ripped but the foreman.
40 tinsmiths and apprentices. up to 5 working roofing gangs. Some as big as 10 men per gang.
I was Apprentice tin smith for I season.
Then bent tin during the off season.
For smaller firm.
Shown how to make and work off of templates.
Then the old tinners that shared their trade secrets.
Nice work sir.
The old timers always said there was no use to caulk those corners. I put some there ‘Just in Case’ there is ever any capillary action.
The tinner’s wings short-circuit one part of the chimney and corner flashings. Water doesn’t hit the step flashings at all unless there is a driven rain. The water goes down the roof to the side.
Two front corners with a tinner’s wing done by others. Nearly eliminates the need for caulk.
And a dormer corner done by me. I used a Multi-Master to clip the wood as necessary. Eliminated the need for any caulk and stopped the leak.
Caulking has become the shortcut to preforming the job correctly Frank.:mrgreen:
Accepted built in obsolescence to keep the industry revolving.
When doing repairs on roofs, I go through plastic cement. WOW.
The examples of trades men work I witnessed help me get evolved in Home Inspections Frank.
What will the next generation of trades men leave behind them as examples of the work ?:roll: